Installing Irrigation
Prepping phase
Warning this was not an easy DIY project and was very time consuming. Therefor this tutorial will be a brief overview highlighting the areas that were most important.
This project does require basic plumbing knowledge and turning off your water mainline at the street if you are cutting into your water mainline before it enters the house. If you are not comfortable cutting into your own plumbing then do not proceed with this project.
***Irrigation Tips and Tricks Click Here***
Tools Needed
- 5 Gallon bucket
- Outdoor Spigot Water Pressure Gauge
- note pad and pencil
- timer/stop watch/ or watch
- outdoor spigot
- local city permit/engineering office phone number
Trench hole digger or Poly pipe puller (available in limited areas)
1.) First you will want to know if you are taking on too big of a job by identifying where you want your irrigation to run. For us there were no obstacles involved such as driveways, rocky soil, side walks, sloping landscape, basements, sewer lines, water lines, gas lines, underground electrical, etc… Identify if you can obtain the tools needed for the job.
We were lucky that a tool rental shop is right across the street from us so that we could easily get a trench hole digger for 4 hours of digging.
2.) Then we reached out to Rain Bird Irrigation Design in order to design our basic blue print plan for this project. Follow the guided instructions on their web site and send them the required information and they will email you back a supply list and blue print layout of where you are going to install your irrigation system. Tell the designers you are going to use Poly pipe for install and it will save you so much hassle when going to buy supplies because they will make you a shopping supply list.
3.) While this is happening you can reach out to your local city engineering office and permit office to investigate what is required before installing your irrigation.
My city engineering department was AMAZING and sent me a booklet on all the information I would need to understand how to tackle this project.
Otherwise you can find that same information at the Irrigation Backflow Preventer Tutorial as I will not be going into detail about the differences.
I chose to incorporate an above ground anti-siphon valve on each of my control valves into my design in which case the entire control valve unit is removed and stored indoors for winter. I did this because A) it was highly recommended by the above backflow tutorial, B) my city engineering department recommended it, C) it was the most cost effective route for my 3 valve manifold , and D) No annual backflow inspection required.
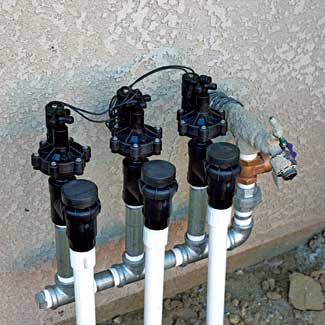
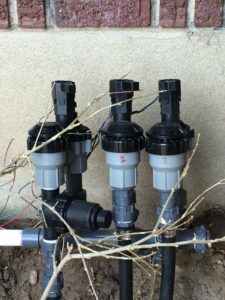
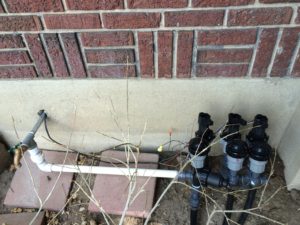
Control Valve Manifold Design
I needed to design a manifold control valve that could tie into my outdoor spigot and utilize the backflow anti siphon control valves. So with these images below I set out to design my control valve manifold and have it inspected by my City engineering department.
4.) I went to my local outdoor irrigation and plumbing store which was easy to find through orbit or rainbirds distributor locator function on their website. DO NOT go to home depot or Lowes unless you want to waste your time but go strictly to a irrigation/plumbing store. I showed them my pictures and my Rainbird schematics and they put together for me a supply package. IMPORTANT NOTE: Do not go to the irrigation store on the weekends but instead go during the week days when they aren’t as busy and bombarded by homeowners. The owner of the plumbing store told us its better to come in during the mid week to get good 1:1 attention and help.
5.) The anti-siphon control valve manifold MUST BE at least 12″ above your highest installed sprinkler head
Important, when you have uneven landscape. You may have to spike a wood stake at your highest point in the yard and then run a sting line to where you are placing your control manifold to make sure you are high enough.
IMPORTANT
“Never install an anti-siphon valve upstream of any other valve. If you do then the anti-siphon valve will not prevent backflow and you have wasted your money buying it. (Exception: drain valves are OK installed after an anti-siphon valve.)
Never use an anti-siphon valve as a backflow preventer installed on the mainline upstream of other valves. This is a common error that a lot of people make. I have heard employees at home improvement stores recommend installing an anti-siphon valve as a backflow preventer with standard electric globe valves installed after it for each of the sprinkler zones. I have seen many contractors do this also. Both should know better! Don’t you do it!!! It will damage the anti-siphon valve. Plus the anti-siphon valve will not prevent backflow when installed this way. You are no better off than if you didn’t use a backflow preventer at all.
Contractors and suppliers: before you blame me for being wrong, do some research. Don’t embarrass yourself! Most anti-siphon valves have a warning on the box or in the installation instructions warning installers. Just read the instructions!
If you plan to use anti-siphon valves, every one of your sprinkler or drip zone control valves must also be an anti-siphon valve. You can use a ball valve upstream of the anti-siphon valves for an emergency shutoff. However, no valves may be downstream of them. If you are paying attention you will note that essentially this is the same thing I said in #1 and #2 above! Hopefully you’re getting the message by now!
Anti-siphon valves should never be installed below ground, even if buried in a box.
You can build an enclosure around the anti-siphon valves to hide them, if they are above ground. However they must be above ground, and the enclosure must allow water to freely drain out of it if the anti-siphon valves leak.”
Cutting into our water mainline
Our mainline was accessible via our basement so there was no digging necessary!!
Supplies
- Pex cutter/utility knife/ or hack saw
- water shut off valve (Specific to your water mainline size, typically 1″ when digging into your yard)
- Pex Crimper (we rented this from Standard Plumbing supply)
- Teflon tape (Purchased 2 rolls from irrigation supply store)
- Non anti freeze water spigot
6.) I measured the diameter of the pex pipe and took pictures of the area I needed to cut into. Then I took the pictures with me to Standard Plumbing Supply (NOT the outdoor sprinkler/irrigation supply store). They were able to sell me the spigot i needed, rent me a pex crimper, and extra 1/2″ x 1ft pex line, shut off valve, outdoor spigot and other necessary supplies to create the PVC connection piece running to my irrigation manifold. I showed them the picture I had and told them I wanted to be able to easily remove it to blow out and winterize my irrigation system and they got all the pieces for me.
7.) We turned off our water mainline in the basement so that we could replace the Ant-siphon Frost Proof Sill cock with a non freeze proof sill cock.
8.) We cut into out 1/2″ pex plumbing (You can use a utility knife, hack saw, or try a poly pipe cutter) to remove the old spigot and install a new water shut off valve specifically leading to the spigot.
9.) Once the new spigot was installed we tested it for leaks before moving forward (this took a lot of time for fine tuning and tightening before we were leak free).
10.) From the spigot I was able to T-off using PVC pipe to my anti-siphon control valve manifold. Valve #1 has a pressure reducer installed because that is running to my garden beds for drip irrigation. Valves #2 and #3 are both regular
Choosing your below ground irrigation supplies
After careful research and talking with the plumbing store owner we decided to go with Poly pipe for our area.
Poly Pros:
- Affordable
- It is flexible light weight easy to work with rolls of tubing
- Durable from breaking in freezing climates
- Quick and easy to handle and install without glue
- Bury your pipes 8-10 inches deep. This should put them below the sprinkler body and out of reach for lawn aeration.
- Same day installation and completion!!
PVC Cons:
- Requires a clean environment for priming and gluing fittings together in the trench
- more time consuming process
- Rigid and difficult to work with
- Requires primer and glue to dry before testing system
- heavy material
- Requires 12ft or deeper trench to avoid breaking during freezing winter months.
Below Ground Supplies
****Remember to lay your poly pipe rolls in the sun so they will uncoil and be easy to handle.****
This is a brief over view to introduce you to the different types of supplies involved in poly pipe irrigation installation. Your specific sizing and type of poly pipe and supplies will be dependent upon your homes water pressure test performed in the planning phase.
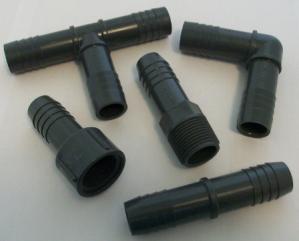
I couldn’t find pictures of a few of the connectors I used (Tee connector to poly pipe run/ sprinkler head). Try and save yourself trips and thoroughly explain your design intentions to the person helping you gather supplies. We made several trips back and forth between the irrigation supply store and our house.
Buy a little more than what you think you need.


Digging
Before you dig call 811 for gas, water, electrical surveying to be done (free service) Once the surveying is done it is only good for 2 weeks and then you have to call and have it done again.
We rented a trench digger and got to work. The entire digging took around 3-4 hours for our front yard (around 200 ft). The install took another 2 days of intermittent working. We tested our lines and then buried them.