First Camp Kitchen

February 2025 update: I only use this kitchen set up if we will be camping for more than 5 nights in one location! Otherwise I keep my kitchen set up minimalist and I do not bring this behemoth of a kitchen!
In the above picture you can see my completed wooden hinged foot vaccum siphon foot pump system, corrugated sink drain, and sink faucet.
Right after we bought the Maggiolina RTT I set out to make our trips as comfortable as possible. I bought a Sportsman’s Warehouse camp kitchen deluxe and got to work!!!
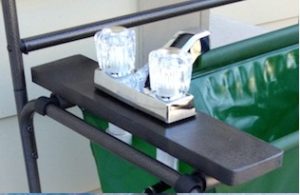
Camp Kitchen faucet
Supplies


Camp Kitchen
- I like the foldable and removable sink top that came with my Sportsman’s Warehouse camp kitchen VS the hard table top that comes with a lot of other brands.
- Caution Problem: The camp kitchens pictured here use a rather inexpensive material for their side counter tops that is susceptible to bubbling up when exposed to excess moisture. On numerous trips I have awoken to water damage from a light early morning dew or rain. Solution spray clear exterior top coat varnish before using outdoors.
Corrugated black flex tubing
Two Handle Chrome Lavatory Faucet Plastic Non-Metalic for $13.99
Scrap wood
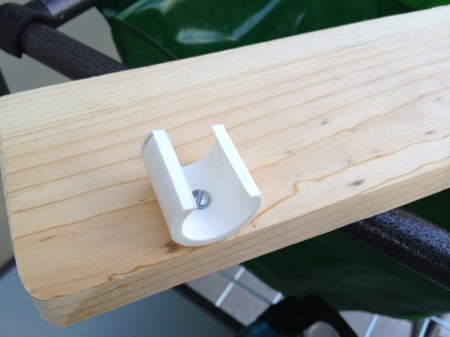
PVC snap clamp (Measure the width of your sink bars that run lengthwise on your camp kitchen to know what size you will need).
scrap wood
wood screws (no thicker than your chosen scrap wood)
paint of your choice
Plumbers tape (To be used anywhere you have a threaded water connection)
PVC threaded hose fittings (You may need to look in the irrigation section of your hardware store and take your faucet with you to find fittings)
(2) Two mini hose clamps
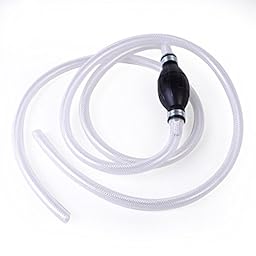
vacuum pressure siphon bulb and tubing (I found it at harbor freight)
Process
1. I started out by measuring the distance between my two horizontal sink bars.
2. cut down my scrap wood to fit over the top of my sink bars
3. attached the 3/4″ PVC footings to the scrap wood with the wood screws (You can find these pre cut footings at home depot).


6. From here its a matter of attaching your water foot pump to your water supply and then to your faucet. I used the mini hose clamps to tighten down the siphon bulb tubing on either end of the bulb (This was an important step and if the clamps are over tightened the water won’t flow through when pumped and will leak without the clamps).
7. Not pictured is the corrugated plastic that I simply pop onto the exposed plastic drain and then run and hang it into my gray water catch basin.
Camp Kitchen Foot Pump
We just added the wooden foot pump to our kitchen spring of 2017 so this has been a newer mod to our kitchen set up
Supplies
(1) One door hinge (I had extras laying around)
(6) Six wood screws dependent upon your size of wood and hinge holes
scrap wood (you can find this at home depot in the back of lumbar in their scrap pile)
Soft Foam ball (This was the hardest thing for me to find and took a lot of searching due to lack of Fred Myers in our current area).

Wooden Dowles
Wood glue
Construction glue
Process

I utilized a tutorial but it was tedious following their vague directions.
- Cut your foam ball in half
- measure the bottom piece of wood to the desired length and cut (I measured out the difference between how much space we had in the carrying bag and our foot sizes.
- I wanted a foot rest for the heel of my foot. So I took a piece of scrap wood and screwed it at the heel end of my bottom foot board
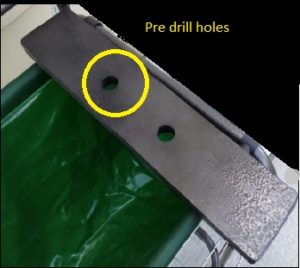
- Then I set the hinge on the bottom piece of wood butted near the foot rest board and marked my holes where I would drill pilot holes (Do not do this to the top portion yet).
- I secured the hinge to the bottom with wood screws
- Measure out the top board until you get your cut size. I did this by setting my top piece of wood (uncut) on top of the secured hinge (without screwing the top in) and laying the foam ball in between the two pieces of wood.
- I cut my top board, drilled pilot holes and attached the hinge and used the construction glue to glue on the foam ball.
- Now i was able to determine where the wooden dowels and siphon bulb would rest and i drilled out the holes for the wooden dowels (which are used to secure your siphon vacuum bulb tubing) and used wood glue to secure them into place.
- You can now prime and paint your finished product!!!!
PROS AND CONS of this kitchen set up
Pros
- I really like the rack under the sink for drying dishes and that there is a hole for the drain to run through down to my gray water catch basin.
- I like the portable canvas bags for quick and easy set up and dismantling at night when the food is put back inside the SUV.
- I love the water on demand foot pump BECAUSE anyone who has gone camping for longer than 3 days knows how important conserving your water is and having the control of the foot pump greatly helps in water conservation. Especially if you have kids around or a husband that don’t fully understand how much water they are wasting!!
- I love the sink and the flexible removable table top that fits on top of the sink when not in use!!
- It is idea for long camping trips in one place!
Cons
- As I mentioned before the quality of the side tables are lacking and need to be modified after purchase but for the entry level price of $109.00 it is worth it!
- I don’t like having my camp kitchen packed separate from my kitchen supplies, right now all of my kitchen supplies are in a separate bins
- It isn’t ideal for camping on the go, so when we camp over night and change locations a lot I don’t take the camp kitchen because it takes up too much space and it takes too long to set up and take down to be worth it.
OVERALL
I still recommend this camp kitchen set up with the entry level price and added modifications you can have a comfortable off grid camping experience.