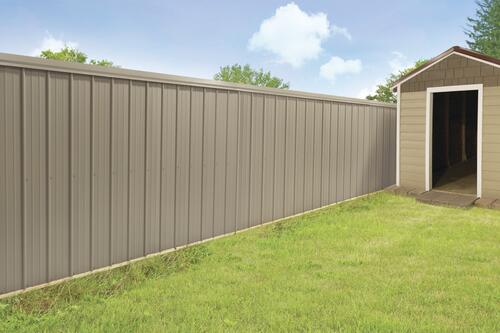
Metal Privacy Fence Panels

There are a lot of great fence building tutorials out there so I am not going to spend a lot of time covering how to build a fence. Instead I want to share with you the helpful steps that I discovered while building our metal panel privacy fence. I will discuss the building differences worth paying attention to for a metal panel privacy fence. I would also like to mention the importance of building a fence correctly especially if living in high wind and storm areas.
It is important to check with your local county ordinances before installing an R metal fence. Most City ordinances prohibit the installation of sheet metal fencing panels and have yet to be updated to modern fencing installation. My own city claimed “it looks trashy” and when installed incorrectly I agree. More importantly DO NOT install galvanized or any shiny or glossy reflective fencing material as this can unintentionally cause light trespassing by refracting unwanted sunlight, vehicle headlights, street lights, porch lights, etc.. into or at your neighbors house. My neighbors house sits significantly lower than ours and they have a shiny galvanized roof which refracts unwanted light and heat at our house. Lastly some city ordinance dictate the depth the fence posts must be buried and the direction that the finished fence must face. Thankfully this is not applicable in Utah or Oregon state laws that I have read but it is applicable in many Texas and Illinois city ordinances that I have come across. So check you state and city ordinances and if not living within city limits then check county ordinances.
If your municipality prohibits the use of these fencing panels there are ways to challenge this.
- The first way is to submit an application along with an instruction manual that clearly states from the manufacturer that this material is intended and being installed appropriately and is marketed as fencing. Menards.com and mueller.com lists such fencing material for sale as a kit and offers such instruction manuals.
- Another option is to submit an application for a zoning variance.
- Lastly submit an application to amend the city zoning ordinance.
Fence Finish Side Facing Direction
Many might not fully understand the engineering and design factors that play an important role in this otherwise often overlooked and abused detail. Many cities have passed laws mandating that the finished side of a fence has to face away from the builders property for aesthetic purposes. However according to Purdue University Don D. Jones and William H. Friday agricultural engineers and Sherwood S. DeForest, P.E., Agricultural Engineer, Consultants publication on Wind and Snow Control Around the Farm, the finished side of the fence should face the windward direction for added strength and stability. To read more go here.
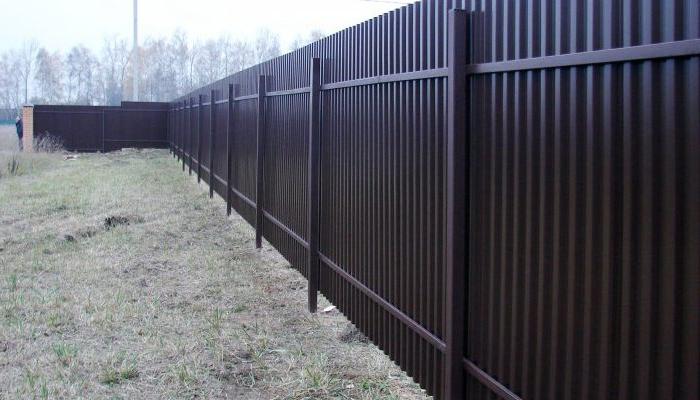
#1. Colored Metal Fencing
Something to consider when installing color metal fencing panels is that if you have sourced the sheet metal from a roofing company or lumber yard, which subsequently obtain their panels from a metal supplier, then the back of the panels are going to be a different color from the color you ordered. The back of the metal panels are usually a standard color of white or gray because roofing and siding panels typically go unseen as they are installed with the desired color side up. Thankfully I had already eluded to my neighbors that the color facing them would be white whereas the color facing us is a light beige. If however like me you find yourself installing a fence on your own property and you don’t live in California then it is of little consequence what your neighbors think.
It is best to use 29 gauge panels vs the 30 gauge panels that are sold in big box stores, which are a thinner and an inferior panel for exterior fencing. By using the thicker sheet panels I was able to use fewer fence rails! I have worked with both sizes of panels and would only recommend using the thicker gauged panels when installing for a fence. Using 3ft wide panels made the installation a breeze.
Pressure treated wood does not work well with metal. The reaction to the chemicals in the wood and copper which is a dissimilar metal cause the metal to rust. It is recommended that you always use untreated stringers to attach the metal to.
#2. Remove Old Fencing
I had originally planned to convert our existing 4ft chain link fence to a privacy fence. This idea died after I ran a cost analysis for the materials necessary to do the conversion. It is most cost effective to remove the old posts and correctly install new fence posts. The issues with using old chain link posts;
A) The chain link fence posts are not adequately installed for a privacy fence. Chain link line posts are installed by being pounded into the ground and aren’t set in cement. This is an issue for taller and heavier privacy fences that require a secure and firm footing.
B) The line posts (the posts in between the terminal/end posts) are typically 1 5/8 in wide and a privacy fence requires the installation of 2 3/8 in 16 gauge at minimum for fence posts of the correct above ground height. For fences built in high wind areas I recommend considering a 13 gauge or 20 weight post with a thickness of 0.95”.
C) Typically chain link fence line posts are set 9-10 ft apart and a privacy fence requires posts to be set between 6 -8 ft apart.
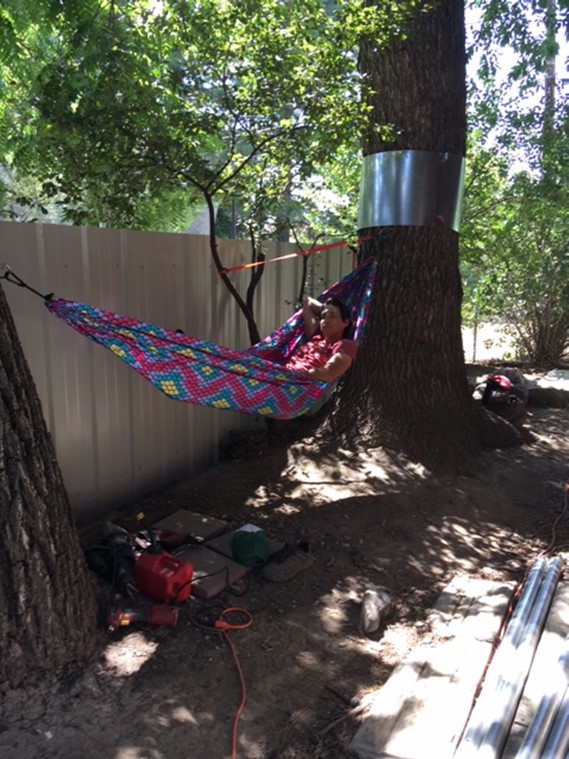
The picture below shows a completed 70ft section of properly installed PBR panel privacy fencing. Next to that new fencing is pictured a 39ft section of old 4ft chain link fencing waiting it’s turn to be replaced. As an example, in order to use the old fencing in this 39ft section I would have needed (10) ten new 2 3/8 in fence posts. Five new posts to cover the old line posts plus five additional posts to place in between the old 10ft sections thus doubling the cost for post materials including cement and adapter brackets.
Upon removal of the old posts and fencing it will only take 5 new posts to continue building the 39ft section of privacy fencing.
#3. Tackle Roots
We had to tackle quit a few large tree roots while running fencing through a heavily wooded section of our property.
Tools used for removing roots;
Auscultating saw
Reciprocating saw (saw zaw) + (1) 3 pack carbide tree limb pruning blades
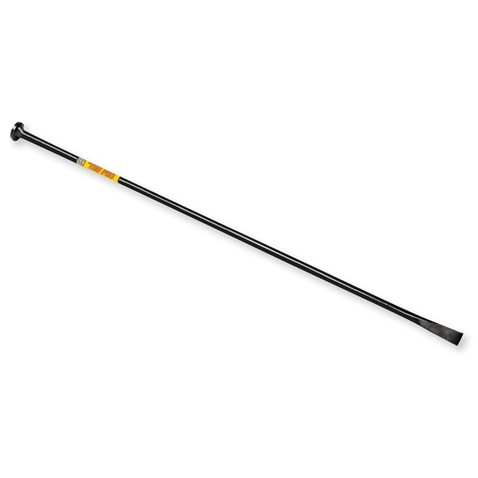
***Post-hole Digging Bar- Was by far the most helpful and successful at removing the roots***
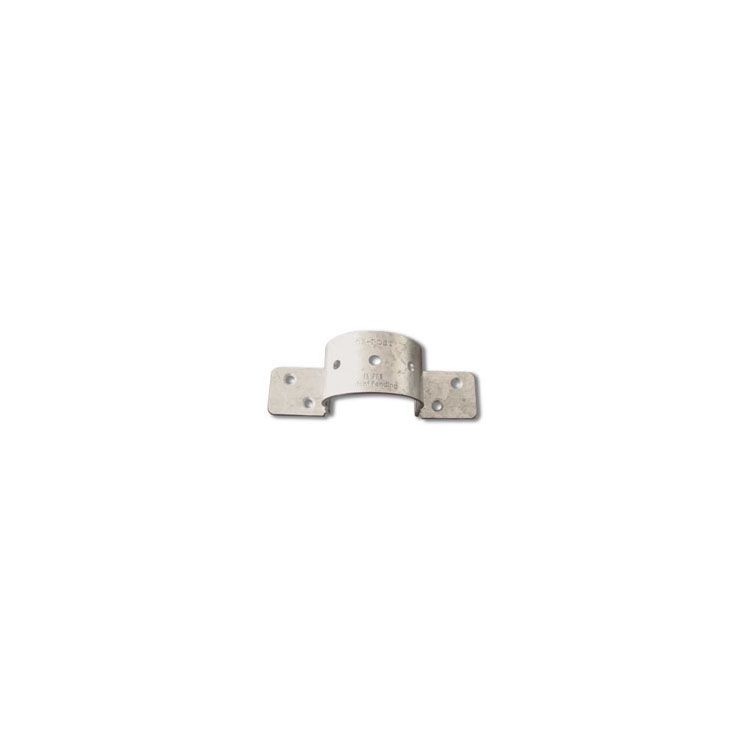
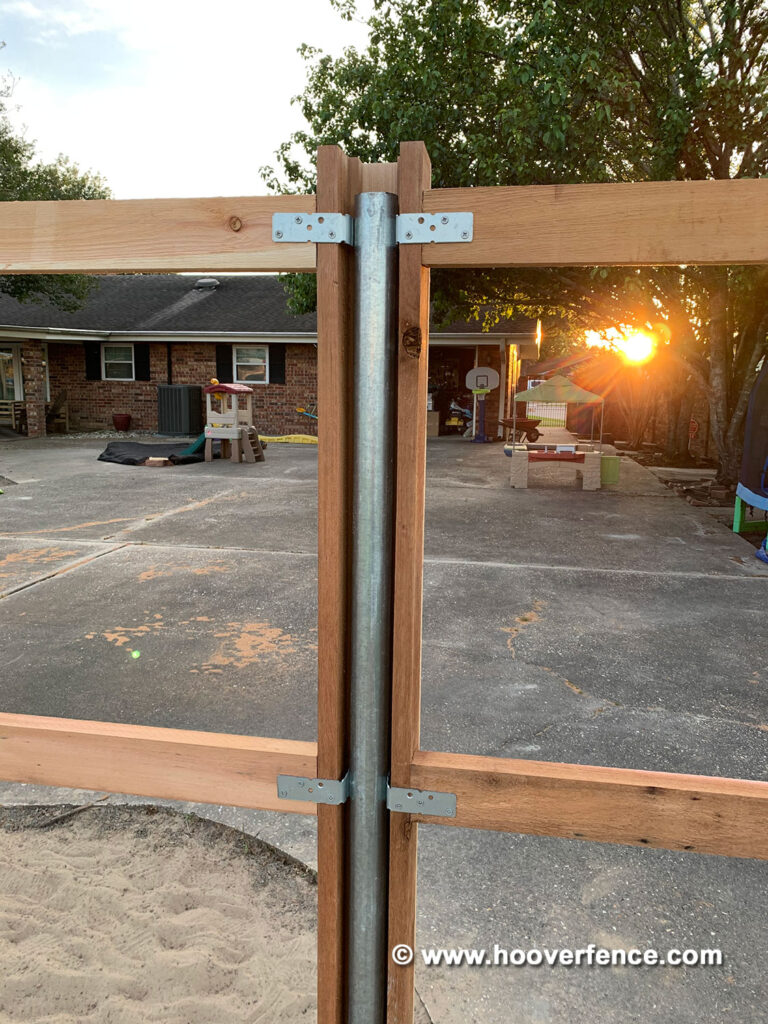
#4. Steel Fence Post Adapters
I found it most cost affective to buy Ozco adapters
Ozco Standard Series Wood to Steel Fence Brackets is-fbs 600
Sadly these were discontinued in or around 2019 after Ozco was bought out by Hillman. Ozco tech rep specialist claims the product was discontinued by hoover fencing and Hoover fencing claims that they were simply a store front for the product and that ozco/Hillman made the decision to discontinue the product.
Specs: for use with 2-3/8” post, 2mm (14 gauge) hot dipped and pressure treated lumber compatible.
Simpson Strong-Tie 2-in 12-Gauge Zmax Steel Pipe Rail Tie Wood To Wood
Item #1944529 Model #PGT2Z-R
This item appears to be similar in design. I spoke with a Simpson engineer today who said that the fence stringers or rails can be installed on either the front overlap joint or inline horizontal between the posts. I was informed that these brackets are not load bearing rated and that the screws are what bear the brunt load or sheer force. I was directed to the sds tech specs for the screws here. Look at the 1/4” x 1-1/2” screw.
#5. Use Large Trigger Clamps
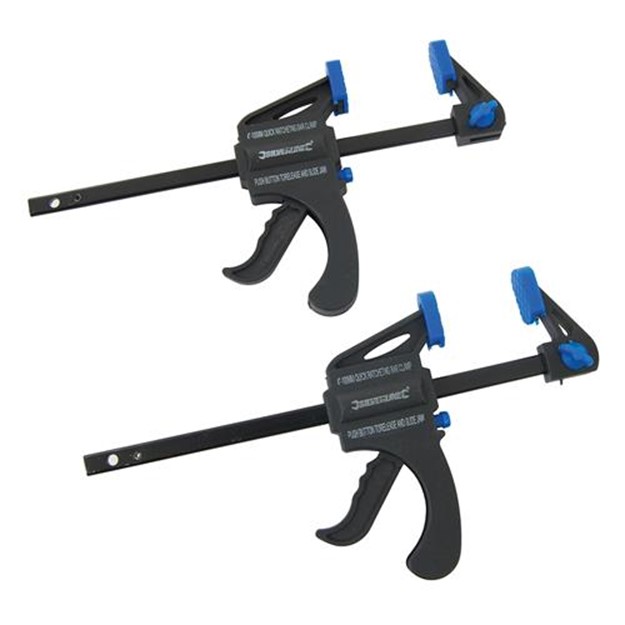
If you don’t already own at least one pair of these then I highly encourage you to make the plunge and buy yourself a set. These are a must have necessity for any DIY home owner!!! I used our large trigger clamps for a one person installation of the fence rails. By clamping these to the fence posts and then setting the wood rails on the top of the clamps it made it possible for one person to install the fence rails and simultaneously adequately level them.
#6. Fill the Inside of the Fence Posts
I would like to begin by saying that I used Quickcrete 50lb bags of no mix posthole cement. It is suggested to first fill your post hole with the dry cement and then push in your fence post down into the hole so that the internal portion of the fence is filled with the dry cement before adding water to set your post permanently. For many reasons I did not follow this suggestion and went back later to fill the internal fence post.
After calculating the internal volume necessary to back fill the post hole to above ground level (24 in deep post holes) I used;
6 cups of cement
1 cup of water
- I used a 64 oz plastic jug to cut the top off and use as a funnel and then I used the bottom portion of the jug to measure and mark out my 6 cups (48oz) for filling the posts with dry cement.
There are a lot of great fence building tutorials out there so I am not going to spend a lot of time covering how to build a fence. Instead I want to share with you the helpful steps that I discovered while building our metal panel privacy fence. I will discuss the building differences worth paying attention to for a metal panel privacy fence. I would also like to mention the importance of building a fence correctly especially if living in high wind and storm areas.
Structure, Posts, & Framing
Panels


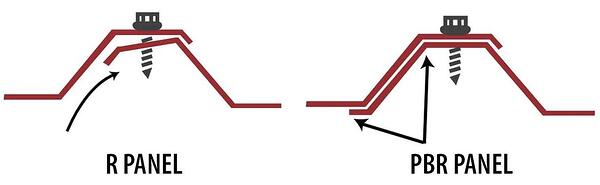
29 and 26 gauge are common thicknesses of structural panels used for fencing either with corrugated or PBR/R panels. What this means is that they are rigid enough to be installed vertically or horizontally and withstand wind and hail. Great news is that there is zero expansion and contraction with metal fence panels and they provide 100% privacy.
When talking with roofing supply companies and distributors that do not sell product specifically for fencing they are going to typically and naively recommend using the thickest metal panels they know which is 24 and 26 gauge and this is because they don’t have any information to follow for fencing installation so they follow their guidelines for structural building such as residential RV parking structures, industrial buildings, etc.. . I have reviewed many fencing specific brochures and instructions which clearly indicate the use and installation of 29 gauge corrugated and PBR/R type panels for fencing.
Framing
There are two predominant ways to install this type of fencing. The first is post and rail and the second is panel fence framing. Post and rail installation can easily be accomplished with materials purchased locally. For panel fence framing there are ready made post and rail kits which are not available for local purchase.
When using the panel frame method these are readily available for purchase in DIY kits. Colorbond is one of the first companies I came across back in 2017 that sells a metal fencing panel privacy fence kit and Currently for the US there is a company out of Tulsa Oklahoma, Perimtec, that sells a very similar fencing kit that fits up to a 1” wide panel. Both companies utilize similar framing systems. Colorbond sells a stand alone metal R type fence panel with posts and rails. Their panels are 0.35mm or 0.01377 thick compared to a 29 gauge panel that is 0.0195” thick or 0.49mm thick. The color bond system uses a top and bottom rail that holds the panels vertically in place without any additional cross rails. This is important to note as stronger thick gauge panels such as 29 do not warp and bend like 30 gauge panels or wood fencing and therefore do not require a third middle cross rail.
Colormax is another ready made metal privacy fencing kit available in the U.S..
The second method is to use the post and stringer rail system. I chose this method as I was able to source and purchase all materials locally. I chose to use 2-3/8” 16 and 13 gauge posts with oz post adapters to cedar backer rails spanning 8’ O.C.
Posts
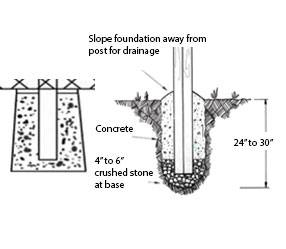
The Achilles heel in any fence is that the fence is only as strong as it’s posts that are correctly installed. The post material such as 4×4 pressure treated ground contact wood vs galvanized (16, 15, 13, 40wt, and such 40 gauge) metal posts, the buried depth, and correct installation methods are going to drastically effect the lifespan of a fence. The best practice for current day fence installations is to use metal posts cemented in place. This means if the fence post is for a 6ft high fence and is 2-3/8” thick then digging a hole that is 3times larger and at a depth 1/3 – 1/2 the height of the finished fence above ground. The depth of which a post is buried and the distance between the posts is determined by local frost depth, soil type, and wind speeds. For a stronger fence the rule of thumb is to bury the post to 1/2 post height and 6ft O.C. For solid privacy fences. The last important step is cementing the posts in place and this includes the correct depth inside of the post as well.
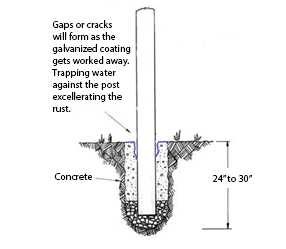
It is recommended to install fence posts below the frost line. Additionally it is recommended for high wind areas to install a fence post 3ft in the ground. For my area prone to high winds this means digging down 3ft. I am also concerned regarding drainage. This means my hole will be 39” in depth and I will back fill with drainage rock 3”, tamp, place post, back fill 3” and tamp, and then fill 33” with cement.
Being a PNW Native I can safely say that wind storms aren’t an issue in northern Oregon or Central Oregon but rain, snow and ice pack are common place issues. Utah on the other hand experiences frequent high wind storms but no rain, ice or snow issues. All of these things can impact and destroy a fence if not properly installed. We have installed galvanized 16gauge post to wood rail fencing in Central Oregon high desert. The posts were installed to 24” deep and 8’ O.C. By using a jack hammer to dig down each post hole. The fence is still standing after 5+ years and I plan on finishing more of the same fence with the 16 gauge steel posts.
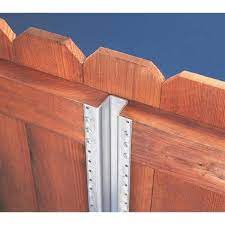
Cross Rails
Structurally it is not necessary to use 3 cross rails on a 6ft tall fence. Per PBR installation the rails. Need to be no more than 5ft apart. Additional steps such as using a riveter to secure the mid section panels together is recommended in the absence of a third rail. A lot of people may not realize that using 3 backer rails/fence rails, stringers on 6ft tall wood fences is a newer technique implemented to again help reduce the warping and shrinking of the wood pickets after being exposed to environmental elements. With the metal panel fencing space the two cross rails/stingers no more than 5ft apart to match building code or pole barn purlin building standards by the metal panel manufacturers.
An advantage of recessed connection, lap joints, dados, or mortise and tenons, where the posts are sculpted to receive the rail, is that the weight of one-half the span of material is transferred to and supported by each of the posts. When mechanical connectors such as fence brackets are employed, some of the weight of the rails and boards are transferred to the posts, but significant forces, now actually shear forces, are carried by the connector. This system, although widely used, tends to negate the purpose of the post by relying on the faster.
winterbottom 2000
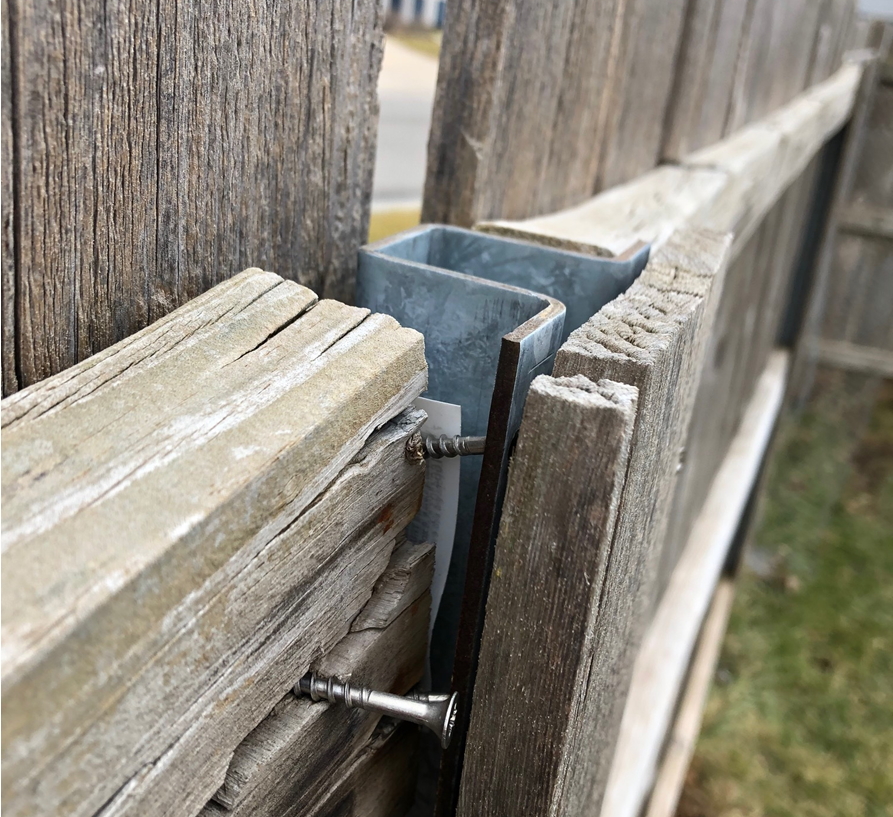
Flush Mounting Rails
This method of fence building is often seen with wood constructed privacy fences and uses the butt joint. As previously mentioned a product engineer for Simpson strong tie stated that there would be no reason that the fence brackets could not be used in this manner.
The fence backer rails are mounted inside/between each line post instead of overlapping the face of the post or face nailing. This method of installation is less resilient to upward wind forces by placing the lateral shear force on the attaching bracket screws. Therefore this installation method is best suited to be used in low wind areas.
When using 2.375” posts the line posts should be spaced edge to edge the length of the rail + 1-3/16”. This will result in 3.125” thick fence including the metal privacy fencing panels.
When installing the fence rails close to the end of the wood make pilot holes using a drill bit that is 3/4 the size of the screw. Doing this will reduce the potential of cracking the wood when installing the screws.
Cons:
- unsubstantiated potential for weaker wind resistance.
- There is a gap between the adapter bracket and fence rail. This gap could potentially lead to early post failure and cracking due to lateral shear force. However this is potentially a non issue as all of the fence panels overlap and lock into one another creating a solid fencing system vs independent cedar planks.
The postmaster is another option however the price has skyrocketed up to $52.00 (8/22) for a single 8ft post. Special ordering would be required for a 7ft or 8ft privacy fence and are not readily sold and available.
Face Mounting Lap Joint

Installing the backer rails overlapping the face of the line posts also known as a lap joint or face nailing results in roughly a 5.126” thick fence including the metal privacy panel. This of course will differ if using a smaller or thicker panel.
With this installation method The screws are secured a few inches from the edge of the fence rail thus reducing the chance of splitting the wood during installation.
The fence backer rails are 100% supported by the post adapters and screws. For the strongest fence rail install using the overlap joint with the finished side of the fence facing head on in the direction of the wind fronts. Use a staggered fence rail installation to further strengthen the fence framing.
Cons
- Thicker fence
- limited working installation space when installing next to building or existing fence.
when using either of these installation methods, if the finished side of the privacy fence is facing the opposite direction of the known wind gusts then it has greater potential of acting as a sail and breaking the fence.
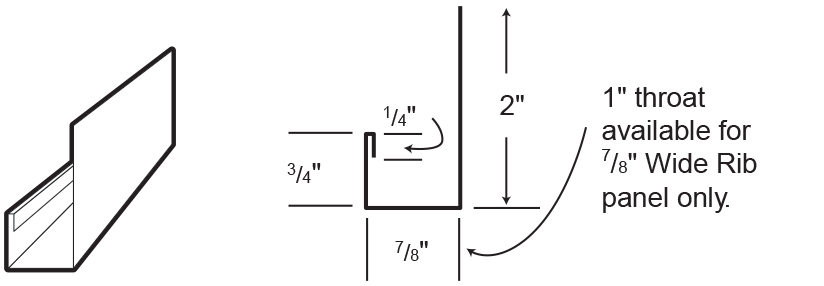
Top Cap
This step is OPTIONAL to give the fence a finished look just add J channel sized to the metal panels rib height. This can be purchased at the same time as the panels from the manufacturer or distributor. Be sure to have enough sheet metal screws with the neoprene washers to fasten the top channel to the fence.
Sources
https://www.redriverfenceok.com/corrugated-quote
https://www.bridgersteel.com/corrugated/34-corrugated-panel (Great selection for corrugated panels with color options)
https://minutemanpostdrivers.com/tips/2020/04/20/easier-fence-installation/