80 series Automotive Auxiliary Power Part #1
Big Picture
I am no expert by any means and what I am going to share here is information that has been acquired from those who have completed their own auxiliary power installations and a lot of time and energy researching and scouring through forum discussions. I have been planning and researching this particular project for over two years now. All of the information I share here was hard earned and I hope I can save someone else a lot of time and questions.
There is the big picture of the compelted job and for me the entire job felt very overwhelming at first. For now I will break it down into small increments that I find easier to digest. This is broken up into a 4 part series and I recommend reading through each part before buying any supplies or starting the physical work.
- Part #1. Creating a Plan, Electrical Voltage Cable Chart, Copper Cable, Relay and switch vs Fuse Block power needs, Lug connectors, fuses
- Part#2. Automotive Grounding, PET fire retardant and Engine high heat resistant cable sleeves, Installing copper cable and lug connectors.
- Part#3. Running Power from the fuse Block, materials and tools list.
- Part#4. Dual Battery 12v set up with IBS-DBS kit
Basic Intro to automotive electrical for overland vehicles
Create a Basic Plan
- #1. What are you trying to run power to?
- #2. What is the amp draw of the device?
- Ex. ARB Fridge port max amp draw 7 amps
- Dual USB charger port 3.1amps
- #3. What is the distance from the supply battery to the device mounting or installation location?
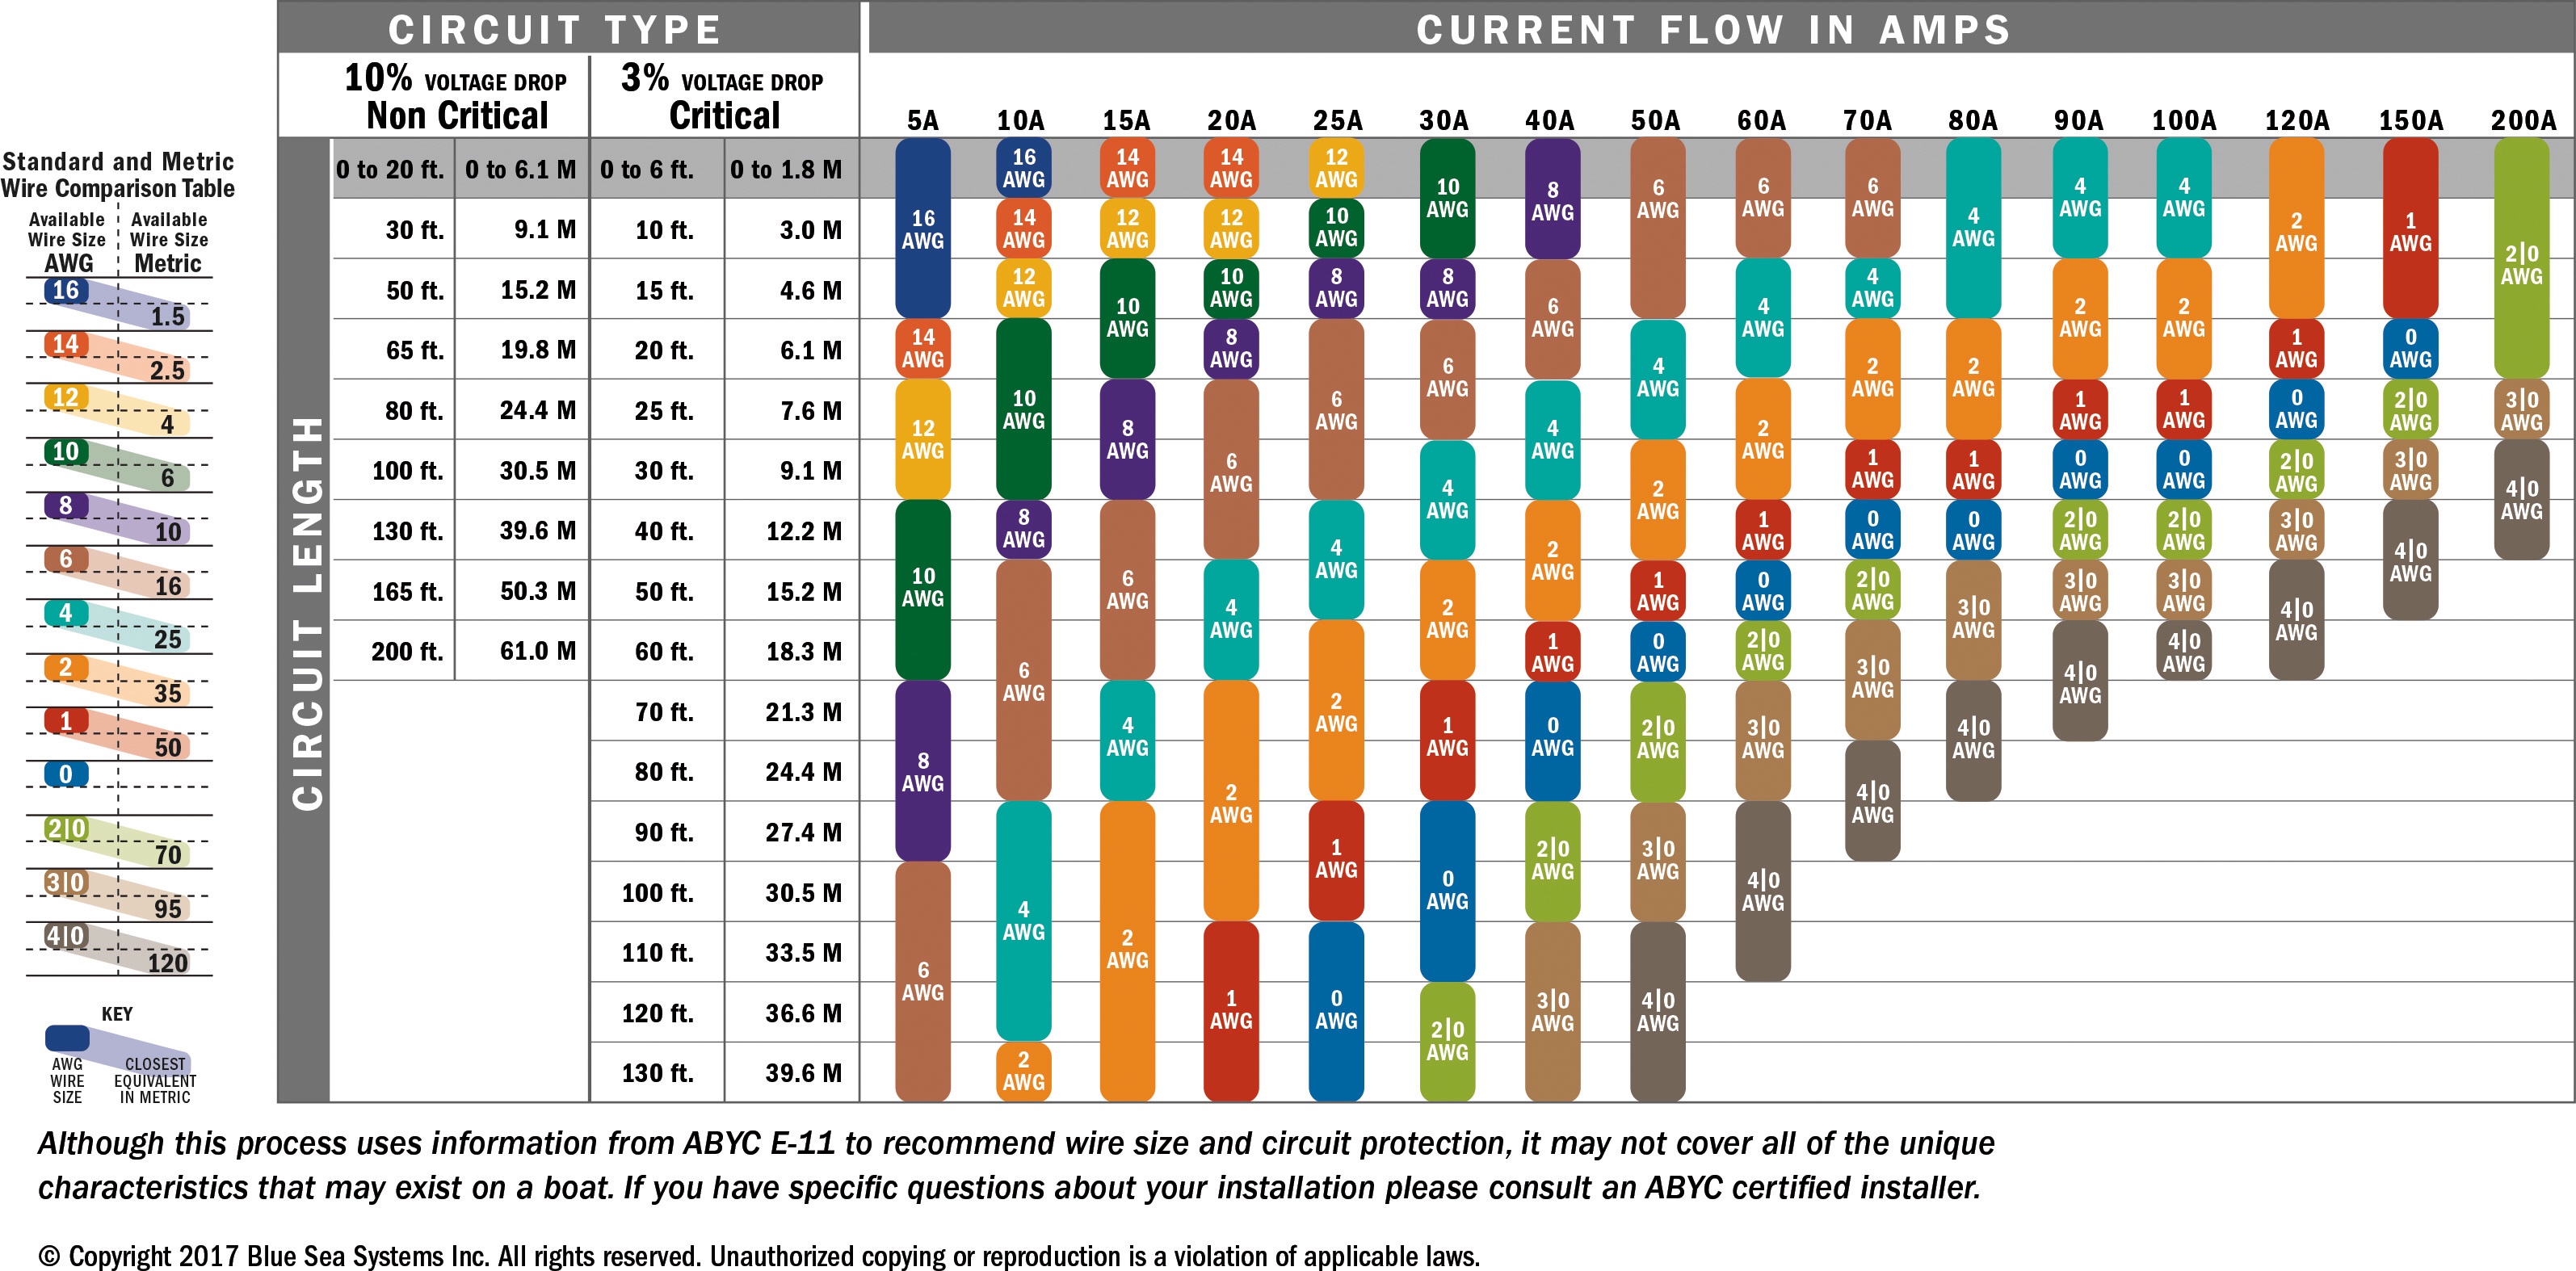
- Using the electrical voltage chart Reference on this page find the current in AMPS of your appliance across the top of the chart and reference it to the distance in feet. Most electrical products include a rating label, or you can find the amperage rating in the documentation that came with the product.
- #4. Total the power draw in amps of all devices
- Note that Devices that pull excess amounts of power such as a winch or air compressor require their own dedicated power supply line.
- My dual ARB air compressor will be installed using its own included wiring harness.
- These heavy power drawing devices (winch or dual air compressors) can not be run through the blue sea fuse blocks and require their own inline fuse and ground.
- Note that Devices that pull excess amounts of power such as a winch or air compressor require their own dedicated power supply line.
- #5. If the amount of power exceeds 30 amps to several devices then the use of a fuse block or Bussman block is necessary.
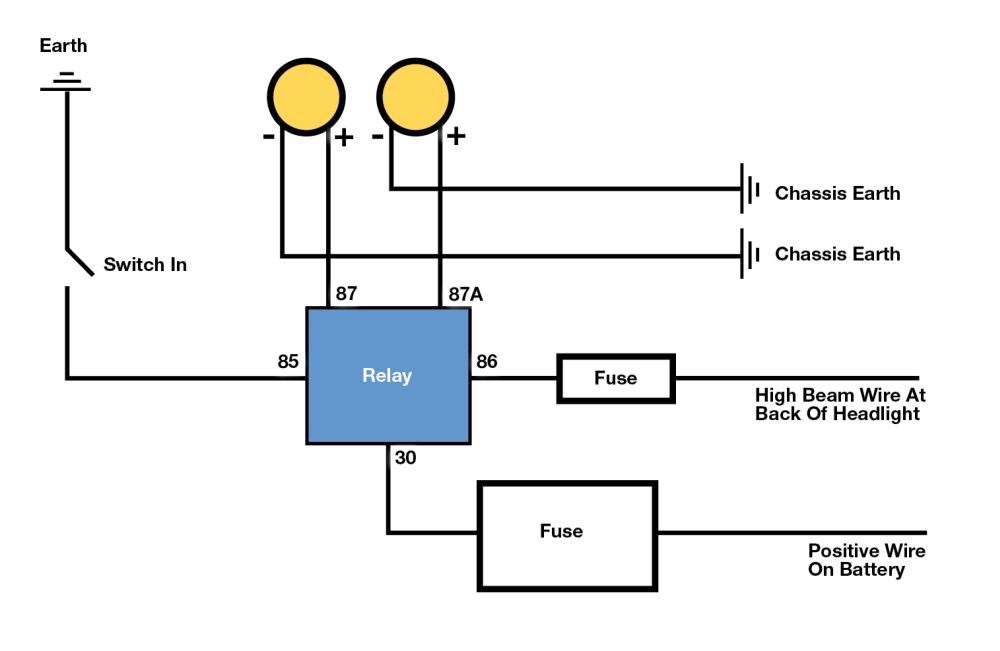
- If the power needed is 30 amps or less then save money and buy a fused relay and switch instead and skip the fuse block.
- #6. Start thinking about whether to install a BlueSea fuse block or a Bussman Fuse Block.
- I chose to install the BLUE SEA ST 5015 fuse block (Fuse Block A) and a Blue Sea 5025 (Fuse Block B).
- It wasn’t until after install that I realized I made a mistake and I did not need to install the fuse block A along the front passenger seat as my accessories being powered could have easily been routed through a fused 30 amp relay and switch.
- You can buy readily made Bussman systems or learn how to make it yourself. Build your own Bussman fuse block.
- I chose to install the BLUE SEA ST 5015 fuse block (Fuse Block A) and a Blue Sea 5025 (Fuse Block B).
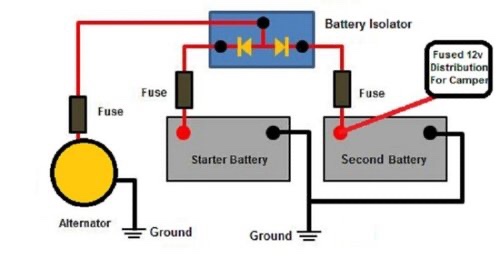
- #7. Is power being run to the main battery or is a second battery being added?
- #.8 What type of battery is being added to the system?
- #9. Where will the second battery be mounted?
I have been using a deep cycle AGM 76ah marine battery for all of our aux power needs for 6 years now. I wanted to mount it in the second battery location in the engine bay and finally stop lugging it around by hand in the cabin footwell. The second battery will eventually need to connect with the main battery via and isolator relay and monitor control so the closer to the main battery it can be mounted will only help me with the finishing touches at the end.
🌟TIP: Only run essential electronics such as the fridge over night and unplug and power everything else off. Charge electronics during the day while solar power or DC-DC charging is at its peak and is topping off the battery.
We rented a camper van 5/2026 for 11 days with a 400ah lithium battery and broken 12v electrical system, broken DC-DC charging and an unknown solar panel and there was a 2amp parasitic drain probably most likely the inverter and only powering our ARB fridge using the 110 outlet we dropped 20% of battery every night. And needed to top off with shore power every 3 days max before dropping below 40%.

Assessing Power Needs
Do you need a second battery to run auxiliary power?
The answer is maybe. If a winch, 12v refrigerator, or an air compressor are being installed then yes a second battery is needed to protect the vehicles main battery from being over drained. A 12v ARB fridge can quickly deplete a battery on a hot day in temps above 85 degrees and leave you stranded if power supply is from the vehicle main battery.
Is using a fuse block really necessary?
The BlueSea 100 amp Fuse Block is a good addition to an electrical system using more than 30 amps of power in one location. If 30 amps of power or less is needed in a location then it is a better idea to install a fused relay and switch and pig tail those smaller power accessories from the relay.
Power Needs
Make a list of all you power needs, the location, and the amp draw. Think big and long term! It’s ok to list things that might not be installed for a year or more. It’s best to install the correct wiring now.
Main Cabin
- Dual USB charging Port 5 amps
- (2) 12v cig outlets gps, fridge monitor & GPS 10 amps total
Rear Quarter Panel Passenger Side
- Dual USB lightening charger 5 amps
- Anderson plug /ARB fridge 7 amps
- Anderson plug / auto H2O system 6.3 amps
- 12v Fan(Road pro RP8000) 1 amp draw 5 amp fuse
- Mr. Heater Base Camp Shower 3.12amp = 5amp fuse
- Back up camera 2 amps
- Subwoofer & amp 30 amps
Electrical Wiring
Wondering what kind of wiring to install? Marine cable, welding cable, battery cable, primary cable, etc.. there are many different types of electrical wiring. For automotive over landing purposes it is advised to use stranded copper wire when running aux power. However not all stranded electrical cable are made equal.
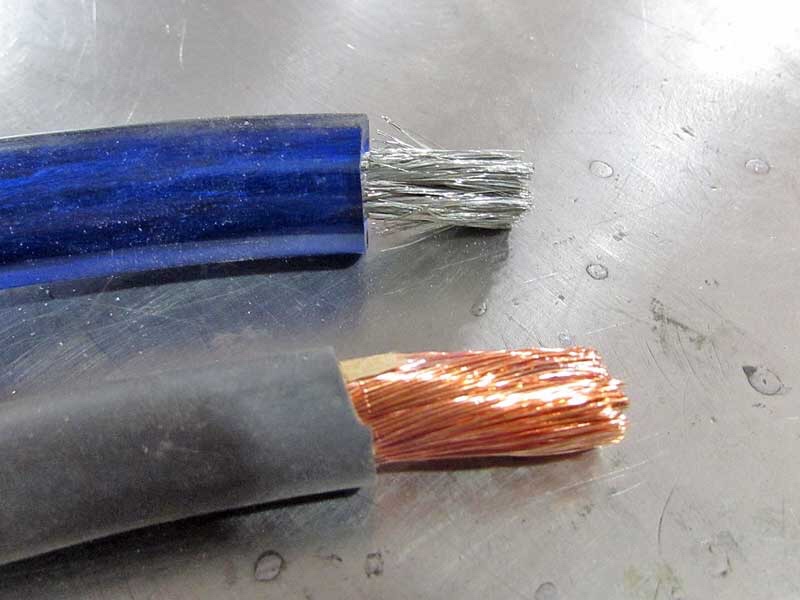
Notice the image above the blue and silver cable is a thin aluminum cable that easily frays and breaks. I did end up using 10 gauge cable like this and I regretted it the entire time! I do not recommend it!
Most forums discuss the use of marine and welding wire.
Marine cable is a tin covered copper stranded cable. This is best suited for prolonged exposure to moisture as occurs in boat electrical. Marine cable is more expensive and in my case didn’t come in the smaller lengths as it readily sells in 25ft or larger spools.
I ended up buying welding cable 6 gauge, 4 gauge, and 16 gauge marine wire. I sourced my 14 gauge electrical wire from Home Depot and I also used 10 gauge cable that I didn’t list because it isn’t one I can whole heartedly recommend.
Welding Cable
For my install I chose to use the battery cable approved welding cable. Yes welding cable is completely copper and will eventually corrode if not properly sealed with dielectric grease. Certain welding cable is not rated for the high heat of engine bay use. Make sure to read the fine print of the product details to verify its use for automotive installation. Additionally it is recommended to add high heat thermal cable sleeve to protect the cables installed in the engine bay. I am using Thermo flex fiberglass sleeve.
The welding cable is flexible while also being highly conductive of high voltage electricity. It is important to note that there is a difference in the wire strand and gauge size from cable used in welding equipment and automotive battery installation.
I recommend installing High heat rated braided wire loom. Over the cables installed in the engine bay.
Voltage Drop & Cable Gauge Size
So i know I will be using welding wire but now what size do I need?
Intersect CURRENT IN AMPS with LENGTH IN FEET to identify the wire size.
The Path of Power
- From the battery 4 awg cable to the 60 amp circuit breaker
- From the circuit breaker 4 awg cable to the junction block then wiring for the switch and relay to the passenger seat fuse block 20-30 amps 6 ft 14-10 awg
- From the junction block to rear quarter panel fuse block 30 amps 10 ft 6 awg.
- Using the 6awg wire to the rear leaves me the option to add on later. This leaves room to add a subwoofer and amp as well as a backup camera.
- It’s best to over install a larger gauge of wire than to under power yourself in the long run and have wasted time, money, and energy redoing something.
- Using the 6awg wire to the rear leaves me the option to add on later. This leaves room to add a subwoofer and amp as well as a backup camera.
- 14 awg cable from the fuse block to the aux ports.
For my install I needed small amounts of wiring. I only needed 6-10ft lengths of wire vs the 25ft+ sold on a vast majority of online websites. I found the automotive battery approved welding wire on homedepot.com and Amazon.
Other worthy online mentions are;
- Genuinedealz.com
- Powerwerx.com
- Waytekwire.com
- https://crimpsupply.com
Vital Tools
I can not stress how necessary and helpful an electrical snake and a good crimper are in this job!

This is a worth wild mention, buy a good pair of crimpers the first time! I foolishly bought crimpers from harbor freight and they never worked great from the start. More than halfway through this project I bought a much needed better pair from Home Depot.

I don’t know what happen but the pair from harbor freight just gave out and stopped compressing the connectors. When looking at my new crimpers I was extremely happy to have the gauge markings on the crimpers. The harbor freight crimpers don’t have any identification markings whatsoever and were never truly adjustable.
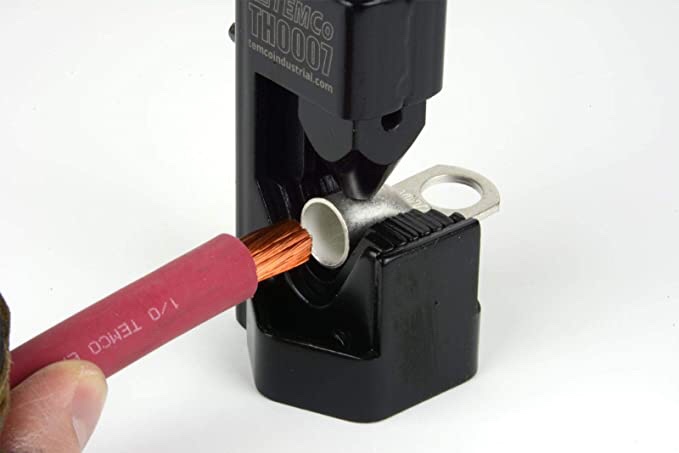
Crimpers
The terminal connectors that install in the engine bay need to be high heat resistant. The insulated connectors found at Home Depot aren’t rated for the engine bay. I bought my engine bay non insulated terminal connectors from genuine deals and powerwerx.
Large gauge crimper. For $20.00 you have two options. You can buy a hammer lug crimper or a manual wire crimp tool that closely resembles a wrench.


Buy Heat shrink in an assorted pack. Make sure there is 1/2” heat shrink to cover the 6awg and 4 gauge . For 2 awg cable buy 3/4” heat shrink.
Junction studs are 3/8”
Battery terminal connectors are 3/8”
Fuse block A. Positive and negative terminal #10-32 power out #8 screw terminal
Fuse block B. Positive and negative terminal #10-32 Power out #8 screw terminal
Sourcing Materials
I purchased locally and online at a break even cost. If I could do it over again I would buy 98% of the supplies online and buy my Anderson plugs local from my local shop.
I found that sourcing materials locally was extremely difficult because the sizes I needed weren’t on hand and other items were sold out. Otherwise it is a break even cost analysis. It was $19.05 for the lug connectors and going to multiple different local stores or order everything at once from Powerwerx.com with S&H $19.89. I bought what I could local and then ordered the rest from powerwerx and genuine deals.
Ordering from Amazon I noticed a significant price mark up when buying low quantity items. Genuinedealz.com offers great prices and free shipping CAUTION the shipping can take over a week or more to arrive. Grainier.com was the fastest at shipping with a 48 hour arrival time and picking up from a local store. With about a $2-$3 price mark up on braided sleeve.
Terminal Rings
- ARB air compressor (2) 8-10 gauge 3/8” lugs for battery terminal
- Powerwerx $1.19 each
- Amazon $6.99 8 awg
- Advanced Auto Parts
- (5) 4 gauge 3/8” lugs battery terminal & junction studs- high heat rated
- Powerwerx $1.49 each
- Harbor freight $2.99 pack of 2
- (4) 6 gauge 3/8” lug/terminal rings for junction studs
- Multiple 10 awg female connectors and (3) 3/8” terminal rings (2) #10 1/4” terminal rings. -apart of heat shrink connector kit from Amazon.
- Lowe’s $7.49 2 pack high heat rated for engine bay
- Relay and switch PIN connectors. These connectors can easily be found in the multi connector pack purchased from Amazon.
- Ground Battery to chassis (2) #10 aka 3/8” terminal rings for grounding cable (10-14 awg)-(amazon kit)
Grounding Wires
All engine mounted electrical wiring should be sheathed in a high heat rated wire cover. It may also be beneficial to install fire resistant braided PET wire cover on the interior cables.
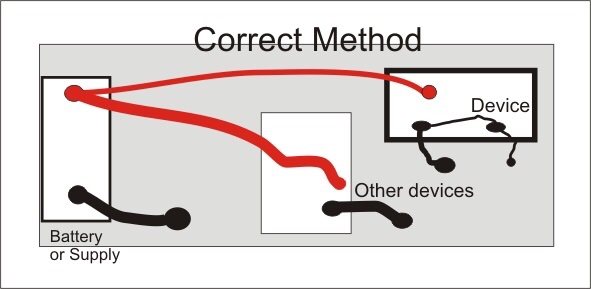
Don’t forget to ground the battery or your connections. This topic was difficult for me to piece together because very little information is readily found that thoroughly explains auxiliary wire grounding. Here are the options I came across for grounding.
Regardless of which wiring set up is used the battery and grounding cable needs to be gauged cable that is large enough to carry all power being transferred. So for instance I have 60 amps estimated to run all aux power ports and then another 40-50 amps for the ARB air compressor that will also run off the second marine battery. Therefore a gauged cable wire needs to be rated for a total possible power run of 110 amps.
Option A
This option requires that every connection be individually ground to the chassis/body by sanding off the paint and attaching the ground wire to the body chassis and covering it with dielectric grease to slow the process of corrosion. This can result in many cable to chassis connections. In this set up none of the grounds interconnect or tie back to the negative post of the battery terminal.
If this set up is used then each ground cable only needs to be sized to accommodate the total amp load of the grounded accessory. Ex. 100 amp fuse block with ground bus bar needs to be ground with 4 awg cable.
Option B
This option is slightly similar to option A in the sense that the auxiliary battery will be ground individually from the main battery. There will be a ground cable to the engine block and frame from the battery negative terminal post and then all subsequent grounds connect to the battery negative terminal post from the auxiliary electrical system. I ran an inline ground from the battery to the junction block and the fuse blocks.
Option C
In this wiring set up the second battery negative ground is tied into the main battery ground.
I didn’t choose this wiring set up because I want to keep my auxiliary power system separated from the vehicles mainline power system.
Choosing a Fuse Block
#1. How many accessories are being powered?
My front power needs are 30 amps for three power ports and a toggle switch. I could have easily installed my 30amp relay and run power straight from the relay to the accessory panel and used jumper/split cables to relay the ground and power. Instead I installed a fuse block leaving myself the option to add on accessories in the future. A fuse block has a limit of 100amps per block and 30 amps per fuse circuit. This means that in a 6 slot fuse block there can not be more than 100amps of power being drawn through the entire box at any given time.

This is important because if I want to install a 75amp power drawing sub and amplifier then I would be better off installing an inline fuse instead of pulling power from the fuse block. the fuse block is idea for smaller powered accessories such as lights, power charging ports, low amp fridge, & 12v accessories.
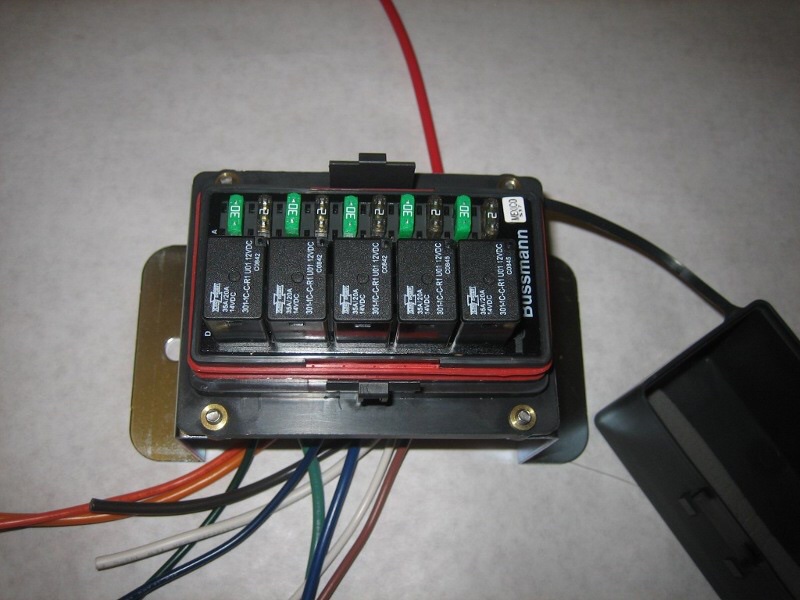
I chose the fuse block pictured here because the mounting holes perfectly align with the existing mounting screw on the side of the seat panel.
You can also research bussman fuse blocks which include the relay and fuses in an all in one location. I didn’t choose this option because the finished products were much larger and more cumbersome for finding mounting locations in what limited space exists.
All About Fuses
All fuses have a voltage rating. To maintain safety, this voltage rating should not be exceeded in application, although it is acceptable to use a higher rated fuse in a lower voltage application. For example: A fuse rated for 125 volts is appropriate in household (110V) or automotive (12V), while a fuse rated for 32 volts is appropriate for automotive (12V), but not for household (125V). Always replace a fuse with one of the same or higher voltage rating. See page 4 for technical specifications (Bussman)