Harvest Right Freeze Dryer- Bringing it Home

⭐️START HERE⭐️

The Freeze Dryer Has Arrived!
Everything To Know About Freeze Drying Tips and FAQ from Utah Extension Office
Now the Freeze Dryer is unpacked and set up ready to start testing.
- Perform Freeze Vacuum test recommended in owners manual
- Perform off Gas cycle recommended in Owners Manual
- Lastly the Bread Test recommended by the owners manual
Premier Pump Owners
Flip the Switch to “ON”.
Freeze Vacuum Test
This is covered in the owners manual. Clicking on the leaf takes you to the Functional Testing Screen. After successfully performing a freeze vacuum test proceed to allow the FD to defrost and dry before moving onto the heat and off gas cycle. So the FD freezes for 20 min and then turn on the vacuum and the mTorr should drop below 500 mTorr within 10- 20 minutes – optimally.
Off Gasing
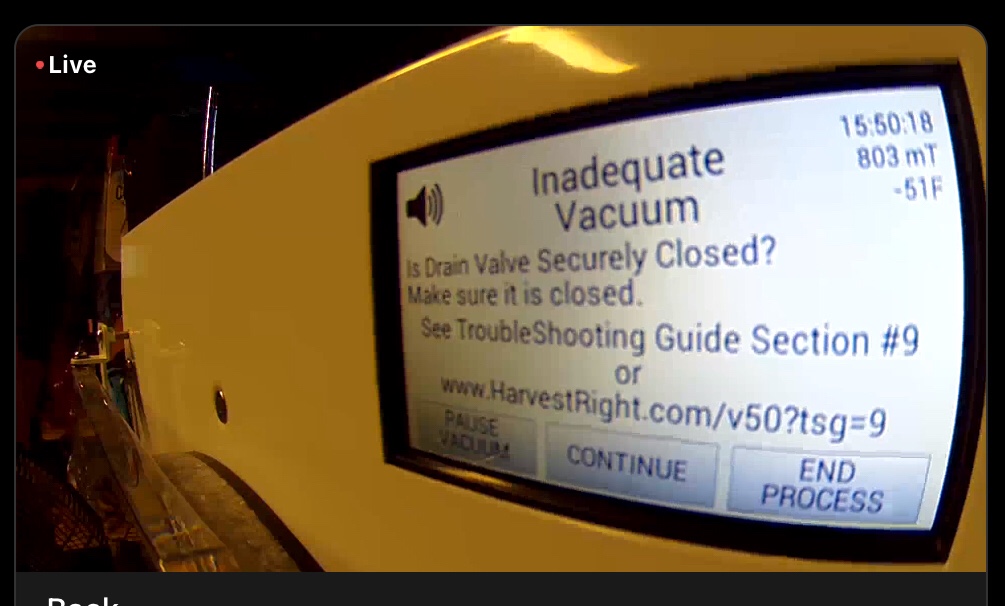
This step is recommended in the owners manual but no instructions are provided so I have included them here. The bad burning rubber or as others describe it as a bad chemical smell isn’t noticeable right away. In fact the smell doesn’t occur until after a full heat cycle has run so unfortunately this issue is often times missed and overlooked. When this step is skipped the smell can transfer to foods and worse an error #9 code can occur and stop an entire batch from processing.
What happens if you skip this step?
Let’s say you blow through and skip this step and have a successful bread run and then you load the freeze dryer for a third or fourth time. After around 10-11 hours the FD will flip an error code #9. Inadequate vacuum and then you will need to come back and do this step! It’s better to encounter an error code when the FD is loaded with bread or in this testing phase vs fully loaded with your favorite foods.
Since your unit is newer, it’s highly likely that there could be an off-gassing problem with the shelves heating pads and adhesives. Luckily t’s quite an easy fix.
- Clean the shelving unit (some mild dish soap and non-scratch scouring pad, make sure to dry it thoroughly after cleaning)
- Place shelving unit into chamber,
- Shelving unit plugged in and Close the door completely latched and drain valve
- Run the heat for 2 hours
- Run heat, and vacuum together for another 12 hours.
- *Change oil (if milky or gunky)
In order to fix this:
Let the unit cool down. Run a vacuum test with the shelving unit in for another 45mins, if it’s under 500mTorr you’re good to go!
Instructions when working with HR tech support
Mock Batch Instructions:
- Change the oil and send a picture of the sight glass with new oil, skip this step if you have an oil free pump. If you have changed the oil already you can skip this step as well.
- Run a mock batch:
-chamber and shelf must be clean
-no trays, no food, don’t use the door pad
-press “start” , Select “Not Frozen” if that option is not available just select “Let the chamber cool” then select “continue”
- Obtain data
-please send the log files back to tech support
Bread Run
- If a vacuum error occurs DO NOT shut off the machine, simply press continue and keep going
Do this 3 times for recurring vacuum errors.
(If you DO get 3 errors and you continue them all and you get a fourth, shut off the machine and send the data to tech support)
Per the owners manual the very first run is to process bread. A great tip offered to me is to douse/spray the bread in white vinegar with a spray bottle. Doing this should help eliminate the melted rubber or chemical smell and eliminate the need to run an additional off gassing run. This batch will take roughly 20 hours depending on your environmental humidity. Allow the bread run to run and do not cancel the cycle. It is a good idea to become familiar with the machines software interface and stopping a batch early robs you of that opportunity.
After this point if no error codes are encountered then it’s good to start a food batch.
Alternatives are to spread coffee grounds on bread or tray, spread baking soda on trays and leave door open after off gas for 24 hours. You should never have to do this again or at least not until the first stinky batch of onions or garlic is run 😁
Freeze Dry Foods
✨⭐️#1 Resource is the Freeze Drying Food Guide that comes with the Freeze dryer
Check out this bloggers list of foods and tips https://oneshetwoshe.com/freeze-dry-foods-list/
Vacuum Sealing vs Oxygen Absorbers – Read Freeze Drying Food Guide
Now begins the everlasting ongoing misunderstanding of an impulse sealer vs vacuum sealer and the actual purpose of an oxygen absorber. for starters an impulse sealer is supplied free with the purchase of every FD. The impulse sealer simply heats up to melt the mylar bag together for an airtight seal and therefore oxygen absorbers (OA) are used to help absorb the excess oxygen in the bags to prolong the life of the food packaged inside not to absorb moisture. If the food is not completely dry moisture can cause the food to go rancid even with the use of an OA. The impulse sealer does not remove oxygen from the mylar bags!!! For detailed explanation go here!
Vacuum Packing Machine – Because oxygen is one of the enemies of food preservation and it’s absolutely everywhere, this can become your secret weapon. The vacuum packing machine helps you remove excess air from cans, jars, bags, or buckets before sealing them. It’s a good way to seal your food. The major downside is that they don’t get out all the oxygen and the packaging typically used is clear plastic. Both water and oxygen can pass through this plastic. So, for medium range storage (two to three years) they are great.
Harvest Right
Mylar bags- only use 7mm or thicker to avoid food loss
A vacuum sealer works by removing the oxygen from the plastic clear bags and often times is thought of for short term food storage of 1-2 years. Oxygen absorbers can be used with the vacuum sealer when appropriate and is approved for freeze dried food storage by the Penn State University Extension Office and Harvest Right. However a vacuum sealer such as Food Saver cannot seal mylar bags and it does not remove adequ
Canning Jars
Canning jars are another optimal form of food packaging that does not require the use of An OA if the jars are vacuum sealed. If however you want to ensure a longer term food storage or don’t want to hassle with vacuum sealing the jars then simply toss in the appropriate sized 300mL OA into pint or quart jars and hand tighten the ring. I have now experienced several lid failures and have decided to omit the vacuum sealing and am simply using oxygen absorbers in my jars. Vacuum sealing jars does not remove enough oxygen to be suitable for long term food storage so a shelf life of 2-3 years can be expected with
Light: Light is a form of energy and when shone on stored foods long enough, transfers energy to the food product. That energy then has the effect of degrading its nutritional content and appearance. Fat soluble vitamins, such as A, D, and E, fats and proteins are sensitive to light degradation. When opening a glass jar of food and finding the food inside two-toned, it was likely exposed to too much light. Although unappealing in flavor and color, it should still be safe to consume. Store food in dark areas.
⛔️🌟✨⭐️https://extension.usu.edu/preserve-the-harvest/files/Food-Storage-Booklet.pdf⭐️✨🌟⚠️
Troubleshooting
With the experiences I have had with HR I expected to run into this error message.
- Freeze and Vacuum Test-Success
- 1st Bread Run – Success
- Off Gassing 14 hour cycle – I didn’t latch the door 100%
- 2nd Bread Run – Failed
- Perform 2nd off gas with door fully latched and reached below 500 mTorr after 6 hours!
- Finished 2nd Bread Run – Successfull
My machine couldn’t adequately and fully heat up enough to properly off gas because I failed to fully latch the door. However my second off gas 6 hour cycle was a success!
Step#1. After ensuring a clean gasket, closed water drain valve I removed the bread trays and proceeded to fully latch the door and run a heat and vacuum cycle for 6 hours until my FD dropped and remained under 500mTorr.
#2. If this did not resolve the issue I would then test the FD for the vacuum freeze test as outlined in the owners manual however this time testing for a bad sensor and electrical harness or epoxy seal leak entering into the drum.
A.) Wash and dry shelving unit to perform a heat and vacuum off gas test. Once dry Turning on the heat and vacuum at the same time and monitoring if the mTorr drops over 45-60min. If the mTorr drops allow the cycle to continue to run until it falls below 400 to 500mTorr. If this test fails then it tells me the issue is unrelated and I need to continue to troubleshoot.
B.) If the heat test passes or fails then run a freeze and vacuum test and if that passes then I suspect it’s a faulty sensor but if this test fails then I suspect an epoxy leak. And will perform testing the seal as outlined by HR troubleshooting video. The freeze and heat tests relates back to freeze thaw, contract and expansion..So it’s important to get the FD to freeze before checking to test for an epoxy seal leak.
No Power
So your brand new FD is all set up and plugged in but zero power!! The size Sm and Med units can be used on a regular 15amp 110/120 volt outlet but it’s best to upgrade to a 20 amp circuit and breaker when possible or verify that the 15amp circuit doesn’t have any other high power appliances on that circuit
If you have the Klein multi tester and transmitter use that to verify correct wiring of the outlet. Or use a no contact Volt detector to verify that power is present at the outlet, this however will not indicate correct or incorrect wiring. Also verify no GFI has been tripped upstream. For example we accidentally triggered a GFI in our entryway outlet and all of the power to our basement shut off, oops this was an expensive lesson.
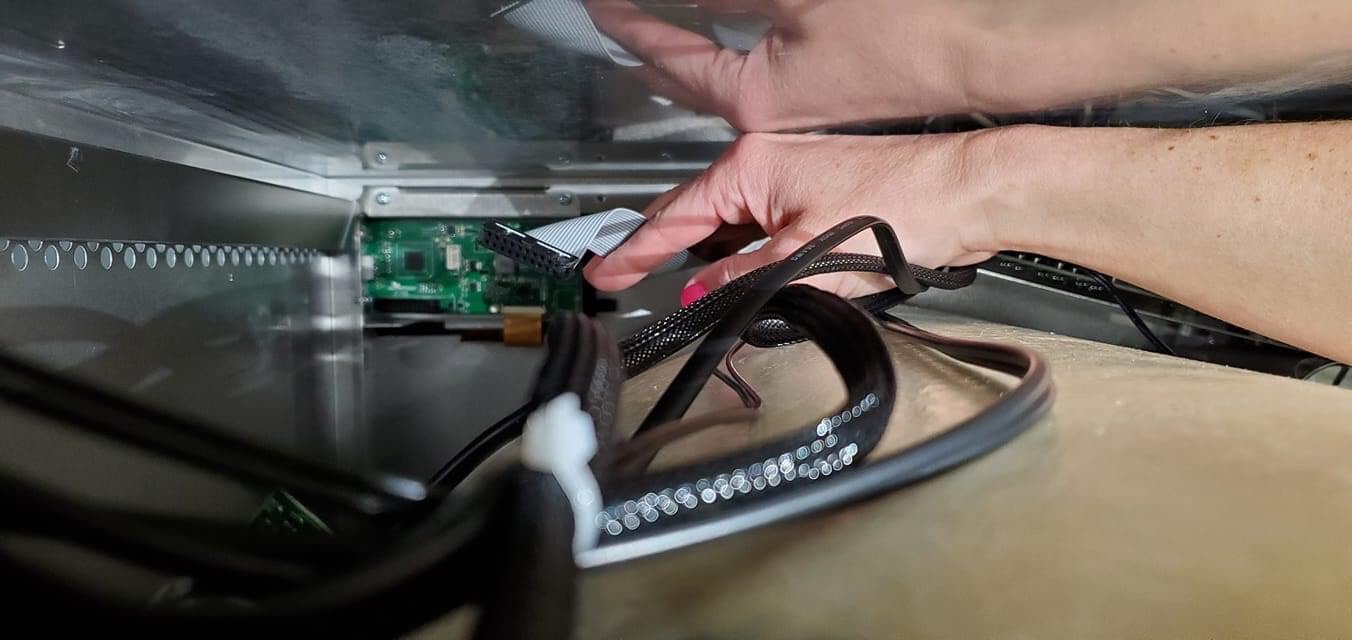
Some FD units arrive and the electrical harness inside the unit is unplugged from the screen. Remove the back panel per Harvest Right instructional video and verify that your harness is plugged in.
Cleaning and Disinfecting
So don’t just take my word on this you are welcome to google away to your hearts content but the fact is that only 70% isopropyl or 70% Alcohol bottle volume (ABV) which is stronger than alcohol proof, has been clinically tested and proven to kill food born microorganisms.
- 70% isopropyl or stronger- this is for disinfecting the FD in between washing it with a low sudsing soap. Using a 70/30 formula mix 70% (70% or stronger isopropyl) to 30% (distilled water).
- Example 16oz spray bottle x 70%=11.2oz
- 16oz spray bottle x 30% = 4.8oz
Flexible drain hose br – this is for cleaning the drain hose before and after the water shut off valve. ⚠️ when using this inside the FD to clean the hose it may become stuck ⛔️ Do Not try and force it out or it will break⛔️ instead try rotating it free or pull your freeze dryer out and access the drain by removing the back panel to clean the hose, you can also remove the drain shut off valve and clean from this point.
Gasket Insulation
I was experiencing frost build up on the exterior of the door gasket. The solution is to create a thermal wrap.
Door Pad?
Let this video explain it all..
The Following is My Own Experience: Day of purchase & Picking up the Freeze Dryer- Our Experience
So today was the day we drove to Harvest Right to pick up our freeze dryer. Leading up to this point my interactions over the phone and in person with the sales team, customer service, and tech departments have left a bitter taste with me and a lot of red flags 🚩. The tech support/customer service are very ill equipped to answer very rudimentary questions. While the sales reps kept trying to push me into pre paying for a FD telling me “well if you try to come and pay and pick it up in the same day then you might be waiting for a few hours while we process your request.” Basically every conversation I have had with HR has contradicted earlier conversations with them.
So I show up and walk into the customer service tech building. There was one woman already there talking to the front desk employee. This woman left and the front desk employee immediately ignores me and Engages in a personal conversation with another male employee who just walked right up and sat down next to her and they start talking about work drama. I finally have to interrupt them and say “excuse me I hate to interrupt but…” and she finally looks up to say “sorry I am waiting for that other woman to come back before I can help you.” So this employee couldn’t have said that earlier instead of letting me stand there listening in on their inter office drama.
So after continuing to needlessly wait I get directed to go to pay for the FD at a different building. After going to the sales building I wait for a sales rep to come take my credit card and make payment. Then with invoice I am then directed back to the customer service building and finally to go to the loading Bay Area. While waiting at loading Bay Area for a seemingly long time the HR employees gathered what appeared to be my package of purchased items including the FD. However upon inspection we noticed that there was damage to the side paneling of the FD and the employee says “oops we brought you the wrong one. Yours is supposed to be new.” Ok so then they send that FD back and I continue to patiently wait.. while waiting this other employee just randomly walks up to me and says “ok well you’re good to go and you have everything you need” and I had to say “yeah I am good to go except I don’t have a FD that I purchased”. Anyway he continues to talk to me about how my order was messed up, something to do with an oil pump being put on my order. I again interrupt him to correct him telling him I have my invoice and there were no mistakes made and everything I purchased was already given to me except for the FD.
The moral of this experience is that HR is a giant sh*t show if mistakes.
Noise
Oil free low profile pump 67dB standing right in front of it. Scroll labs manufacturer claims 55dB but I have never gotten below 62dB even after having it completely rebuilt.
Yay medium freeze dryer installed and running a bread run…
Now onto the important question about noise!!
Sound and sensory overload or sensitivity. This is a very real problem for some people where sounds and lights can be very anxiety inducing, panic attack inducing, stressful triggers that can keep some one awake all night, cause insomnia, etc.. myself included. We have gone to great effort to quiet and control our homes sound and light pollution. As for sound we installed sound dampening closures on all of our kitchen and bathroom cabinets, I made 5 layer thick insulated thermal black out curtains for just about every window on our main floor, thats 18 single pane windows on the first level of the house alone! The sound of the neighbors dogs shrieking uncontrollably is unbearable for me and is absolute mental torture leaving me with uncontrollable nausea. When the neighbors friend pulls up in front of their house playing their insidious base it shakes our house, makes me dizzy, nauseas, and causes real physical pain.
Now that you know how bad sound is for me.. onto the freeze dryer.
During the daytime when my house is the quietest, no TV, nothing except the low hum of the fireplace blower motor, the washing machine or dryer, the welcoming white noise of the HVAC, the occasional sound from the dishwasher draining the water into the drain pipes. Humming along is the freeze dryer in the basement. I can hear it’s very low tone very similar to the vibrations of a vacuum cleaner on a smaller scale or an air compressor on a small scale.
It is a good idea to set up the FD away from any sleeping area. I installed our FD in the basement on the wall farthest away from our bedroom where the electrical outlet and space permitted. It’s is the exact opposite side of our bedroom and living room so the only time we hear it is when we walk through the dining room , kitchen, or late at night when everything is powered off.